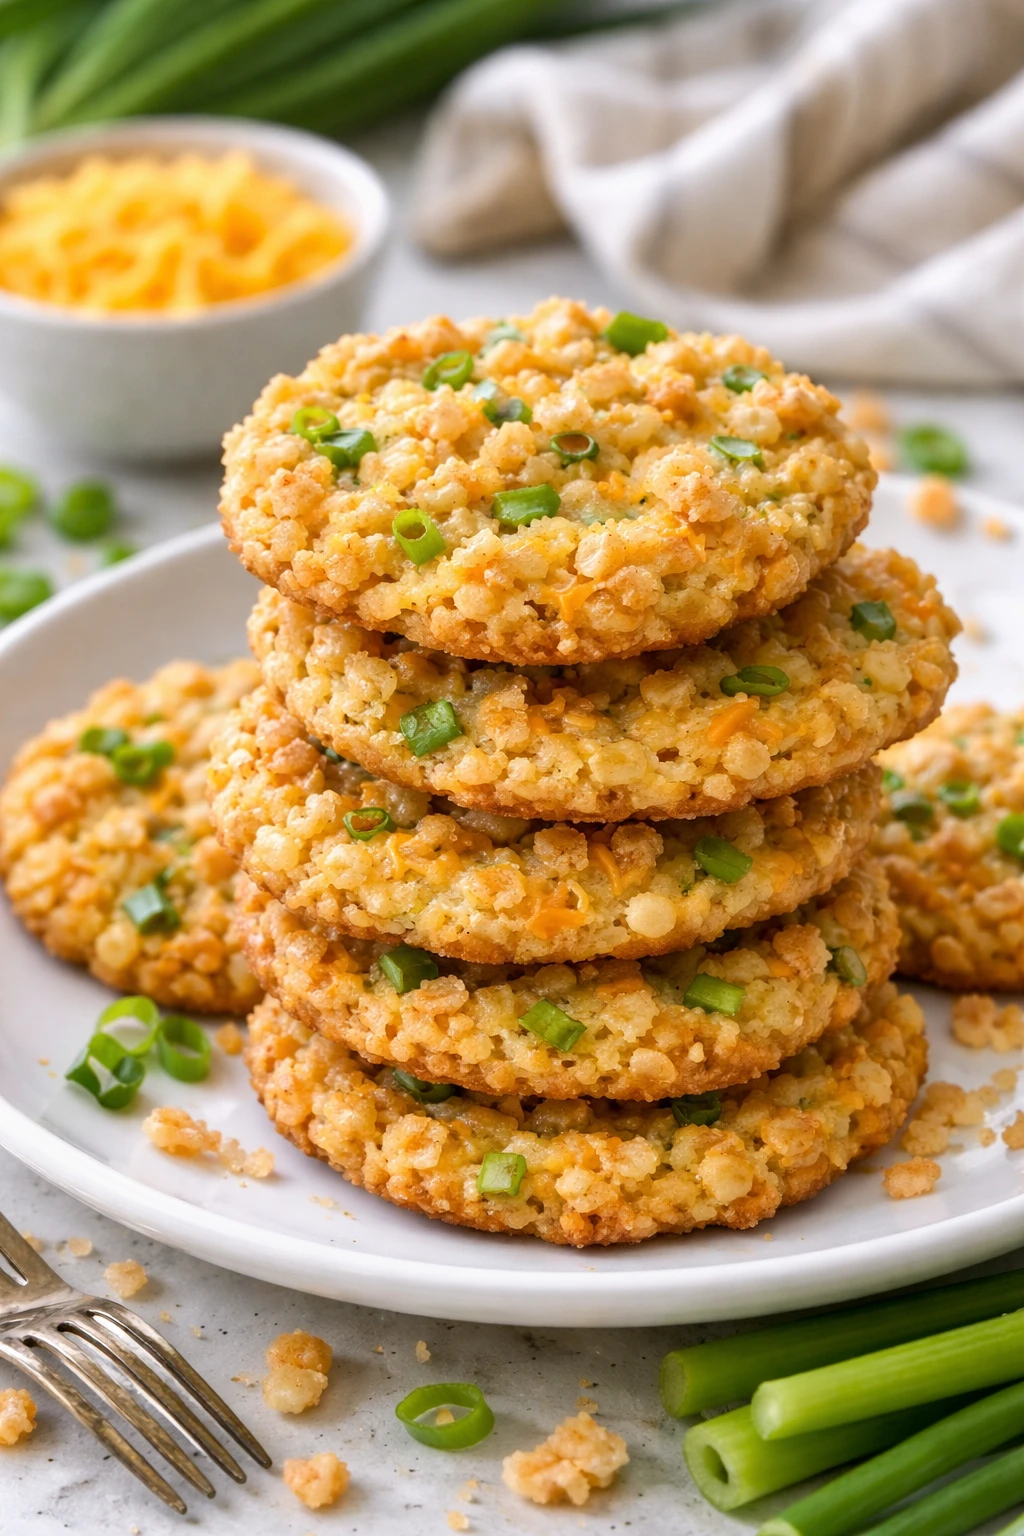
These salty, cheesy cookies get a fun crunch from Rice Krispies folded in right before baking. Perfect for snacking or bringing to parties when you want something a little different and addictive!
Introduction
I first stumbled upon the idea of adding Rice Krispies to cheese cookies when I wanted to jazz up a classic savory snack. I’ve always loved cheddar cheese cookies, but sometimes they feel a bit dense or one-note. The trick I learned is folding in Rice Krispies right at the end—it adds this unexpected light crunch that makes every bite pop. It took a couple of tries to get the balance just right; too many Krispies and the dough wouldn't hold together, too few and you missed that satisfying crisp. What you end up with is a salty, cheesy cookie that’s crispy on the outside and tender inside, with a delightful rice puff crunch. They're perfect for afternoon nibbling or bringing to a party where you want something unique but easy. I love how simple ingredients come together with this little twist to create a snack that feels homemade but special. Plus, they bake up quickly, so you can have a batch ready in under 30 minutes. Honestly, once you try these, I think you’ll find yourself making them again and again!
How To Do It
Step 1
Start by creaming the softened butter and grated sharp cheddar cheese together in a large bowl. Use an electric mixer on medium speed for about 2-3 minutes until the mixture is smooth and fluffy. This step is crucial because properly creamed butter and cheese trap air, which helps the cookies bake up tender and not too dense. If you rush this, the texture will be off, and your cookies might turn out flat and greasy. Make sure your butter is softened but not melting to get the right consistency.
⏱ Time: 3 minutes
✓ Doneness: Mixture should look creamy, pale, and slightly fluffy with no lumps.
Step 2
In a separate bowl, whisk together the all-purpose flour, salt, and cayenne pepper if you’re using it. This ensures the seasonings are evenly distributed throughout the dough. Slowly add the dry ingredients to the butter-cheese mixture, mixing on low speed just until combined. Overmixing here can develop gluten, making the cookies tough instead of tender. Stop mixing as soon as you don’t see any flour streaks.
⏱ Time: 2 minutes
✓ Doneness: Dough should look uniform, soft but not sticky.
Step 3
Gently fold in the Rice Krispies cereal with a spatula. The goal is to incorporate the cereal without crushing it, so your cookies keep that light, airy crunch. Folding is key here—avoid stirring vigorously or mixing with a mixer, as that will break down the Krispies and lose the texture we’re after.
⏱ Time: 2 minutes
✓ Doneness: Rice Krispies should be evenly distributed and mostly intact in the dough.
Step 4
Preheat your oven to 350°F (175°C) and line a baking sheet with parchment paper. Use a teaspoon or small cookie scoop to portion out the dough onto the sheet, spacing them about 2 inches apart. This spacing allows the cookies to spread evenly without merging. If you crowd the pan, the cookies will bake unevenly and lose their crisp edges.
⏱ Time: 5 minutes
✓ Doneness: Cookies shaped into small mounds spaced evenly on the baking sheet.
Step 5
Bake the cookies for 12-15 minutes, checking at the 12-minute mark. You want them golden brown around the edges but still a bit soft in the center. The cheese and butter will melt and bubble slightly, creating that delicious savory aroma. Overbaking will dry them out and make the Krispies less crunchy.
⏱ Time: 12-15 minutes
✓ Doneness: Edges are golden brown, centers look set but slightly soft.
Step 6
Once out of the oven, let the cookies cool on the baking sheet for 5 minutes before transferring them to a wire rack. This resting time allows the cookies to firm up and the Rice Krispies to set their crunch. Moving them too soon can cause them to break apart since they’re still soft when hot.
⏱ Time: 5 minutes
✓ Doneness: Cookies feel firm enough to lift without breaking.
Step 7
Store the cooled cookies in an airtight container at room temperature. They keep well for a few days but best enjoyed fresh for maximum crunch. If you want to refresh the crispiness after a day or two, pop them in a 300°F oven for 3-5 minutes to revive the texture.
⏱ Time: N/A
✓ Doneness: Cookies maintain their shape and crunch after storage.
Step 8
For serving, these cookies pair wonderfully with a sharp cheese platter or even a chilled glass of white wine. The combination of salty, cheesy, and crispy makes them a crowd-pleaser. Try serving them alongside fresh veggies or dips for a fun appetizer twist.
⏱ Time: N/A
✓ Doneness: Cookies complement other snack items well.
Step 9
If you want to get creative, sprinkle a little extra grated cheese on top before baking or add herbs like thyme or rosemary to the dough for an herbal note. Just make sure to adjust the salt accordingly. These small tweaks can elevate the flavor profile and keep the recipe fresh for repeat baking.
⏱ Time: N/A
✓ Doneness: Enhanced flavor from added toppings or herbs.
Variations
Add Herbs and Garlic
Mix in 1 teaspoon dried rosemary or thyme and 1/2 teaspoon garlic powder into the dough for an herby, savory twist that pairs beautifully with the cheese flavor. These cookies become more aromatic and complex, perfect for serving with wine or soup.
Note: Herbs can dry out dough slightly, so watch for consistency and add a splash of milk if too stiff.
Use Parmesan Instead of Cheddar
Swap sharp cheddar for freshly grated Parmesan for a nuttier, saltier flavor. Parmesan melts differently, so cookies will be crisper and less tender but with a great bite and a slightly different aroma.
Note: Because Parmesan is drier, reduce flour by 1-2 tablespoons to maintain dough moisture.
Spicy Cheese Cookies
Add 1/2 teaspoon smoked paprika and a pinch of cayenne pepper for a smoky, spicy version. This variation adds warmth and depth, making these cookies great for parties or as a snack with a cold beer.
Note: Spices intensify during baking, so adjust amounts according to taste.
Gluten-Free Version
Replace all-purpose flour with a gluten-free blend suitable for baking. The texture will be slightly more crumbly but still delicious. Rice Krispies are naturally gluten-free, but check the brand to be sure.
Note: Gluten-free dough may need extra binding; add 1 egg white or 1 tablespoon ground flaxseed mixed with 3 tablespoons water.
Add Chopped Nuts
Fold in 1/4 cup finely chopped walnuts or pecans for added crunch and a nutty flavor that complements the cheese. This adds richness and a bit more texture variety to each bite.
Note: Nuts can brown quickly; watch baking time to prevent burning.
Pro Tips
Use cold Rice Krispies straight from the box and fold them in gently.
Cold, fresh Rice Krispies maintain their crisp texture when baked. Folding gently prevents crushing, which would release starch and cause sogginess, ruining the cookie’s crunch.
Cream butter and cheese until light and fluffy for a tender crumb.
Proper creaming traps air in the fat, helping the cookies rise and develop a delicate texture. Skipping this makes cookies dense and heavy.
Don’t overmix once you add the flour to avoid tough cookies.
Overmixing flour develops gluten, resulting in a chewy, rubbery texture instead of tender, crumbly cookies.
Chill the dough briefly if it feels too soft to handle easily.
Chilling firms the dough, making it easier to scoop and preventing excessive spreading during baking, which helps keep the cookies thick and chewy.
Bake on parchment paper for even cooking and easy cleanup.
Parchment prevents sticking and promotes even heat distribution, ensuring the cookies brown evenly without burning on the bottom.
Let cookies cool on the baking sheet before moving.
Cooling on the sheet allows cookies to set and firm up, reducing breakage and preserving their shape and texture.
Store cookies in an airtight container at room temperature.
Air exposure softens the Rice Krispies and cookie edges. Airtight storage maintains crispness and freshness for several days.
Common Mistakes to Avoid
Mixing Rice Krispies too vigorously
Why it happens Many think stirring aggressively is faster or more thorough, but it breaks the cereal down.
Fix Fold in the cereal gently with a spatula, lifting and turning the dough carefully to keep the rice puffs intact and crunchy.
Using melted butter instead of softened
Why it happens Some confuse softened with melted butter, thinking it speeds mixing.
Fix Use butter softened at room temperature—firm but pliable—to trap air during creaming for tender cookies.
Overbaking the cookies
Why it happens Waiting for cookies to look fully browned can lead to drying out.
Fix Pull cookies when edges are golden but centers still slightly soft; they firm up as they cool.
Skipping the salt or seasoning
Why it happens Some avoid salt thinking cheese is salty enough.
Fix Add salt and optional cayenne to balance flavors and enhance the cheese’s sharpness.
Not spacing cookies properly on the baking sheet
Why it happens Crowding the pan is common when trying to bake lots at once.
Fix Leave 2 inches between cookies to allow even heat circulation and prevent merging.
Nutrition
Per Serving:
Nutritional values are estimates and may vary based on specific ingredients used.
Storage & Tips
Room Temperature
Store the cookies in an airtight container at room temperature for up to 3 days. Keep them away from humidity to maintain crispness. Covering them properly prevents the Rice Krispies from becoming soggy or stale.
Refrigerator
You can refrigerate the cookies for up to 5 days, but they may lose some crunch as moisture settles in. To enjoy them at their best, bring them to room temperature or re-crisp in a warm oven for a few minutes before serving.
Freezer
Freeze cookies in a single layer on a baking sheet, then transfer to a freezer-safe bag or container for up to 2 months. Wrap tightly to prevent freezer burn. Thaw at room temperature and refresh crispness by warming briefly in the oven.
Reheating
Warm cookies in a 300°F oven for 3-5 minutes to restore crispness without drying them out. Avoid microwaving, as it can make cookies chewy and soggy. Adding a little time in the oven helps re-crisp the Rice Krispies and refresh the buttery flavor.
Make Ahead
You can prepare the dough 1 day ahead, wrap tightly, and refrigerate. Scoop and bake fresh the next day for best texture. This saves time and lets the flavors meld, resulting in even tastier cookies.
FAQ
Can I use pre-shredded cheese instead of grating my own?
Pre-shredded cheese often contains anti-caking agents that can affect melting and texture. For the best flavor and smooth dough, I recommend grating fresh sharp cheddar. It melts better and integrates more evenly, giving a superior cookie texture.
What if my dough feels too sticky to handle?
If the dough is sticky, chill it in the fridge for 15-20 minutes. This firms up the butter and makes scooping easier. Avoid adding extra flour, as it can dry out the cookies and change texture.
Can I substitute Rice Krispies with another cereal?
Rice Krispies have a light, airy crunch that works perfectly here. Substituting with denser cereals like cornflakes or granola may alter the texture and moisture balance. If you try a swap, fold in gently and expect a different crunchy experience.
How do I store leftover cookies to keep them crispy?
Store cookies in an airtight container at room temperature with a piece of parchment paper between layers to absorb moisture. Avoid plastic wrap directly on cookies, as trapped moisture can soften the Rice Krispies.
Can I make these cookies vegan or dairy-free?
Replacing butter and cheese with vegan alternatives is possible but the flavor and texture will change. Use a firm vegan cheese and plant-based butter. The Rice Krispies crunch will remain, but expect a different savory profile.
Why do my cookies spread too much during baking?
Spreading can happen if the dough is too warm or if too much butter is used. Chill the dough before baking and measure ingredients carefully. Also, make sure your oven temperature is accurate to bake cookies evenly.
Is it necessary to add cayenne pepper?
Cayenne is optional but adds a subtle warmth that enhances the cheese flavor. If you prefer no heat, just leave it out. The cookies will still be deliciously cheesy and crunchy.
Can I freeze the cookie dough before baking?
Yes! Scoop the dough onto a baking sheet, freeze until firm, then transfer to a bag. Bake from frozen, adding a couple extra minutes to baking time. This is great for quick fresh cookies anytime.
Final Thoughts
I hope you enjoy these crunchy, cheesy cookies as much as I do! Give them a try and let me know how they turn out — I’d love to hear your favorite twists.